
Raspberry Digital Signage docs
RASPBERRY DIGITAL SIGNAGE
About | Download | Donation | Docs | FAQ | Changelog | Plugins | Signage Orchestrator
Long story short (wired network/dhcp)
Connect your Pi to a wired network cable and boot; system’s IP address is shown on screen upon boot.
Raspberry Digital Signage boots in full-screen (kiosk) mode displaying the saved web resource. In order to configure the system, browse from your PC to (login: admin / password).
Full docs
If no wired/dhcp network is available, Raspberry Digital Signage boots showing the network admin page (default login: admin / password), where you can setup your network connection (wired or wireless), with physical access to the Pi. Once you select a connection method, a reboot will be performed.
If network is available, Raspberry Digital Signage boots in full-screen (kiosk) mode displaying the configured web resource. System’s IP address is shown on screen upon boot. In order to configure the system, browse from your PC to http://<IP_ADDRESS>/settings (default login: admin / password).
Once network is set, administration can/must be performed remotely via browser, without physical access to the Raspberry Pi.
You can always modify Pi’s network connection by browsing from your PC to http://<IP_ADDRESS>/networks.
Network admin interface
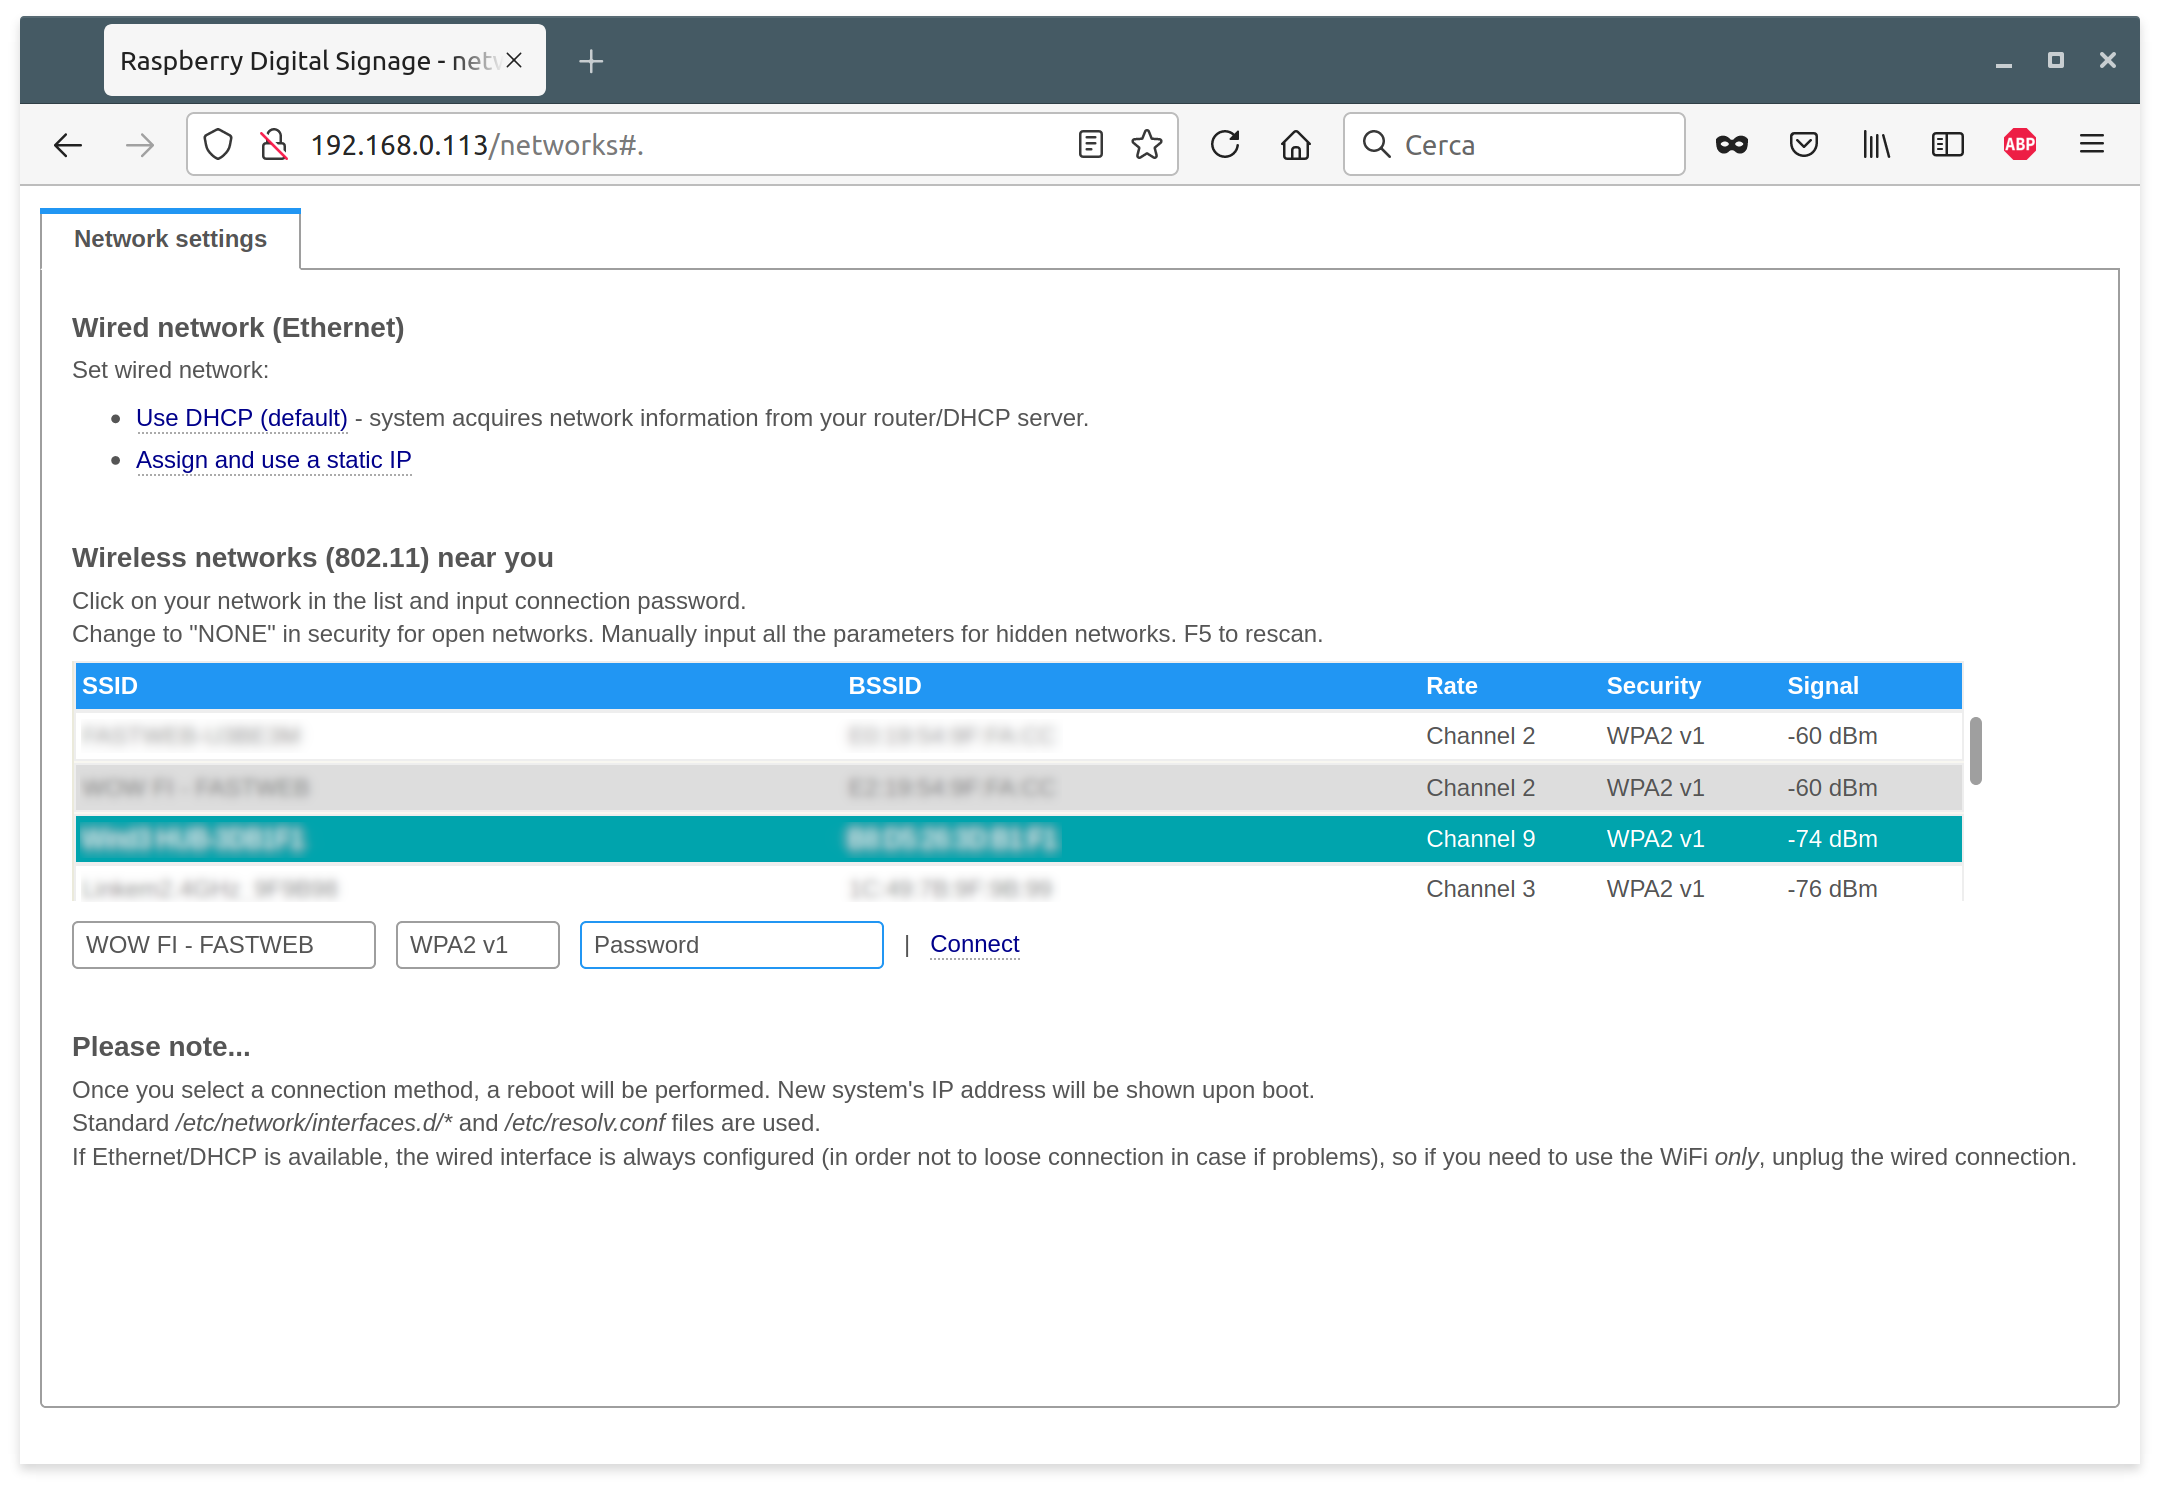
Self explanatory.
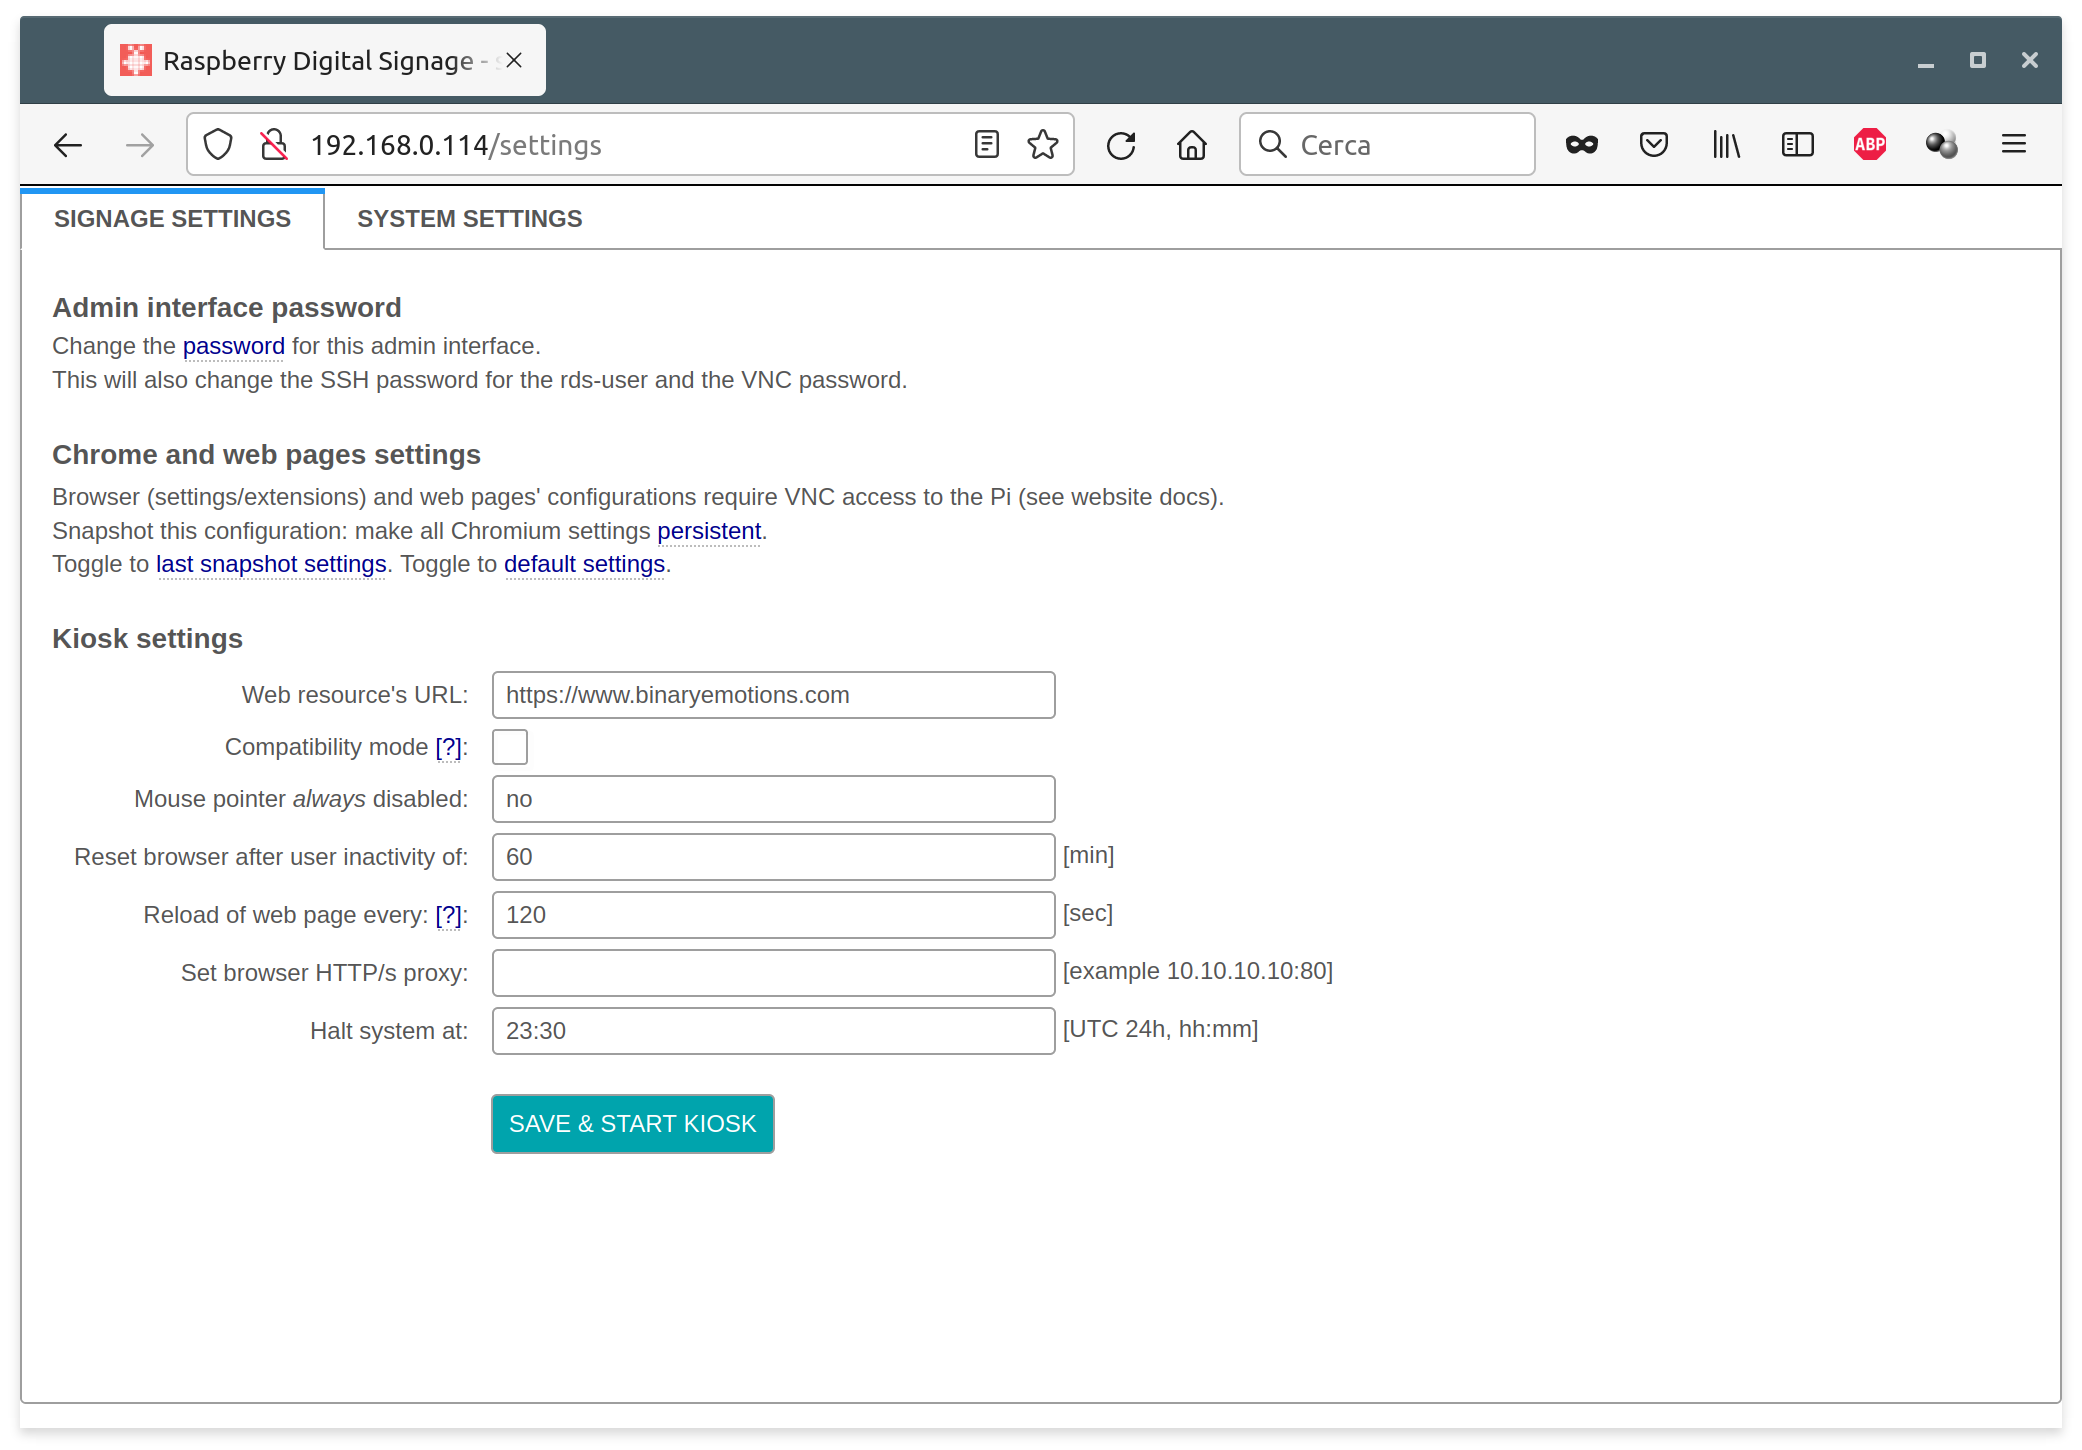
Admin interface
Signage settings:
Admin interface password
This changes the admin interface password, as well as the rds-user password (SSH) and the VNC one all together. Remember to change the default system password at first setup.
Kiosk settings
Here you can configure the URL of the web resource displayed by the full-screen browser.
A token (the machine’s MAC address without “:” characters) is transparently added at the very end of the web resource URL, allowing multiple Pis insisting on just one server location, for example: http://yourserver.com?rdstoken=080027fe959b. It’s then up to your server logic sending the appropriate resource to the client, if you need different content for each client to be displayed (1).
A browser full reset after a specified user inactivity feature is available, which will – nomen omen – kill and completely reload the browser.
A reloading of web page content after a specified time is possible as well. Please note that not every site is compatible with this feature (a completely white page means a no-go).
Kiosk URL is loaded by default within an iframe, however some resources refuse to run within browser iframes, even ignoring the X-Frame-Options HTTP response header; again, a white page is a symptom. From v.16 a compatibility mode has been added: by enabling it, the resource will be loaded as a “normal” page.
For example, the DAKboard resource you see in the About page is run with the compatibility mode enabled; some Google resources require the compatibility mode to be turned on as well.
Chrome and web page settings
While you can configure the system via the admin page quite completely, when you need to modify browser settings/extensions and page cookies/passwords, a virtual access to the whole Pi’s screen is required.
Browse to the admin settings page via browser and then access the Pi via VNC (default password: password).
At any time you can make a snapshot of the state of your Chromium and pages’ settings (cookies, auth and so on), so that you can restore the browser to last-persisted or default settings at a later stage.
Some Chrome extensions are installed by default:
- Scrollbar Customizer (enabled): with this extension it’s possible to modify the scrollbars’ sizes, thick to hidden. Very thin scrollbars are set as default (2).
- Virtual keyboard, on-screen virtual keyboard (disabled; enable if needed).
- tabtiles (disabled). Enable this if you need to display a useful pseudo-navigation menu (if the displayed resource opens window popups).
- Url slideshow (enabled). Configure it to turn the signage in a slideshow of web sites (check the extension’s options Start on browser start and Fullscreen). Quite cool.
System settings:
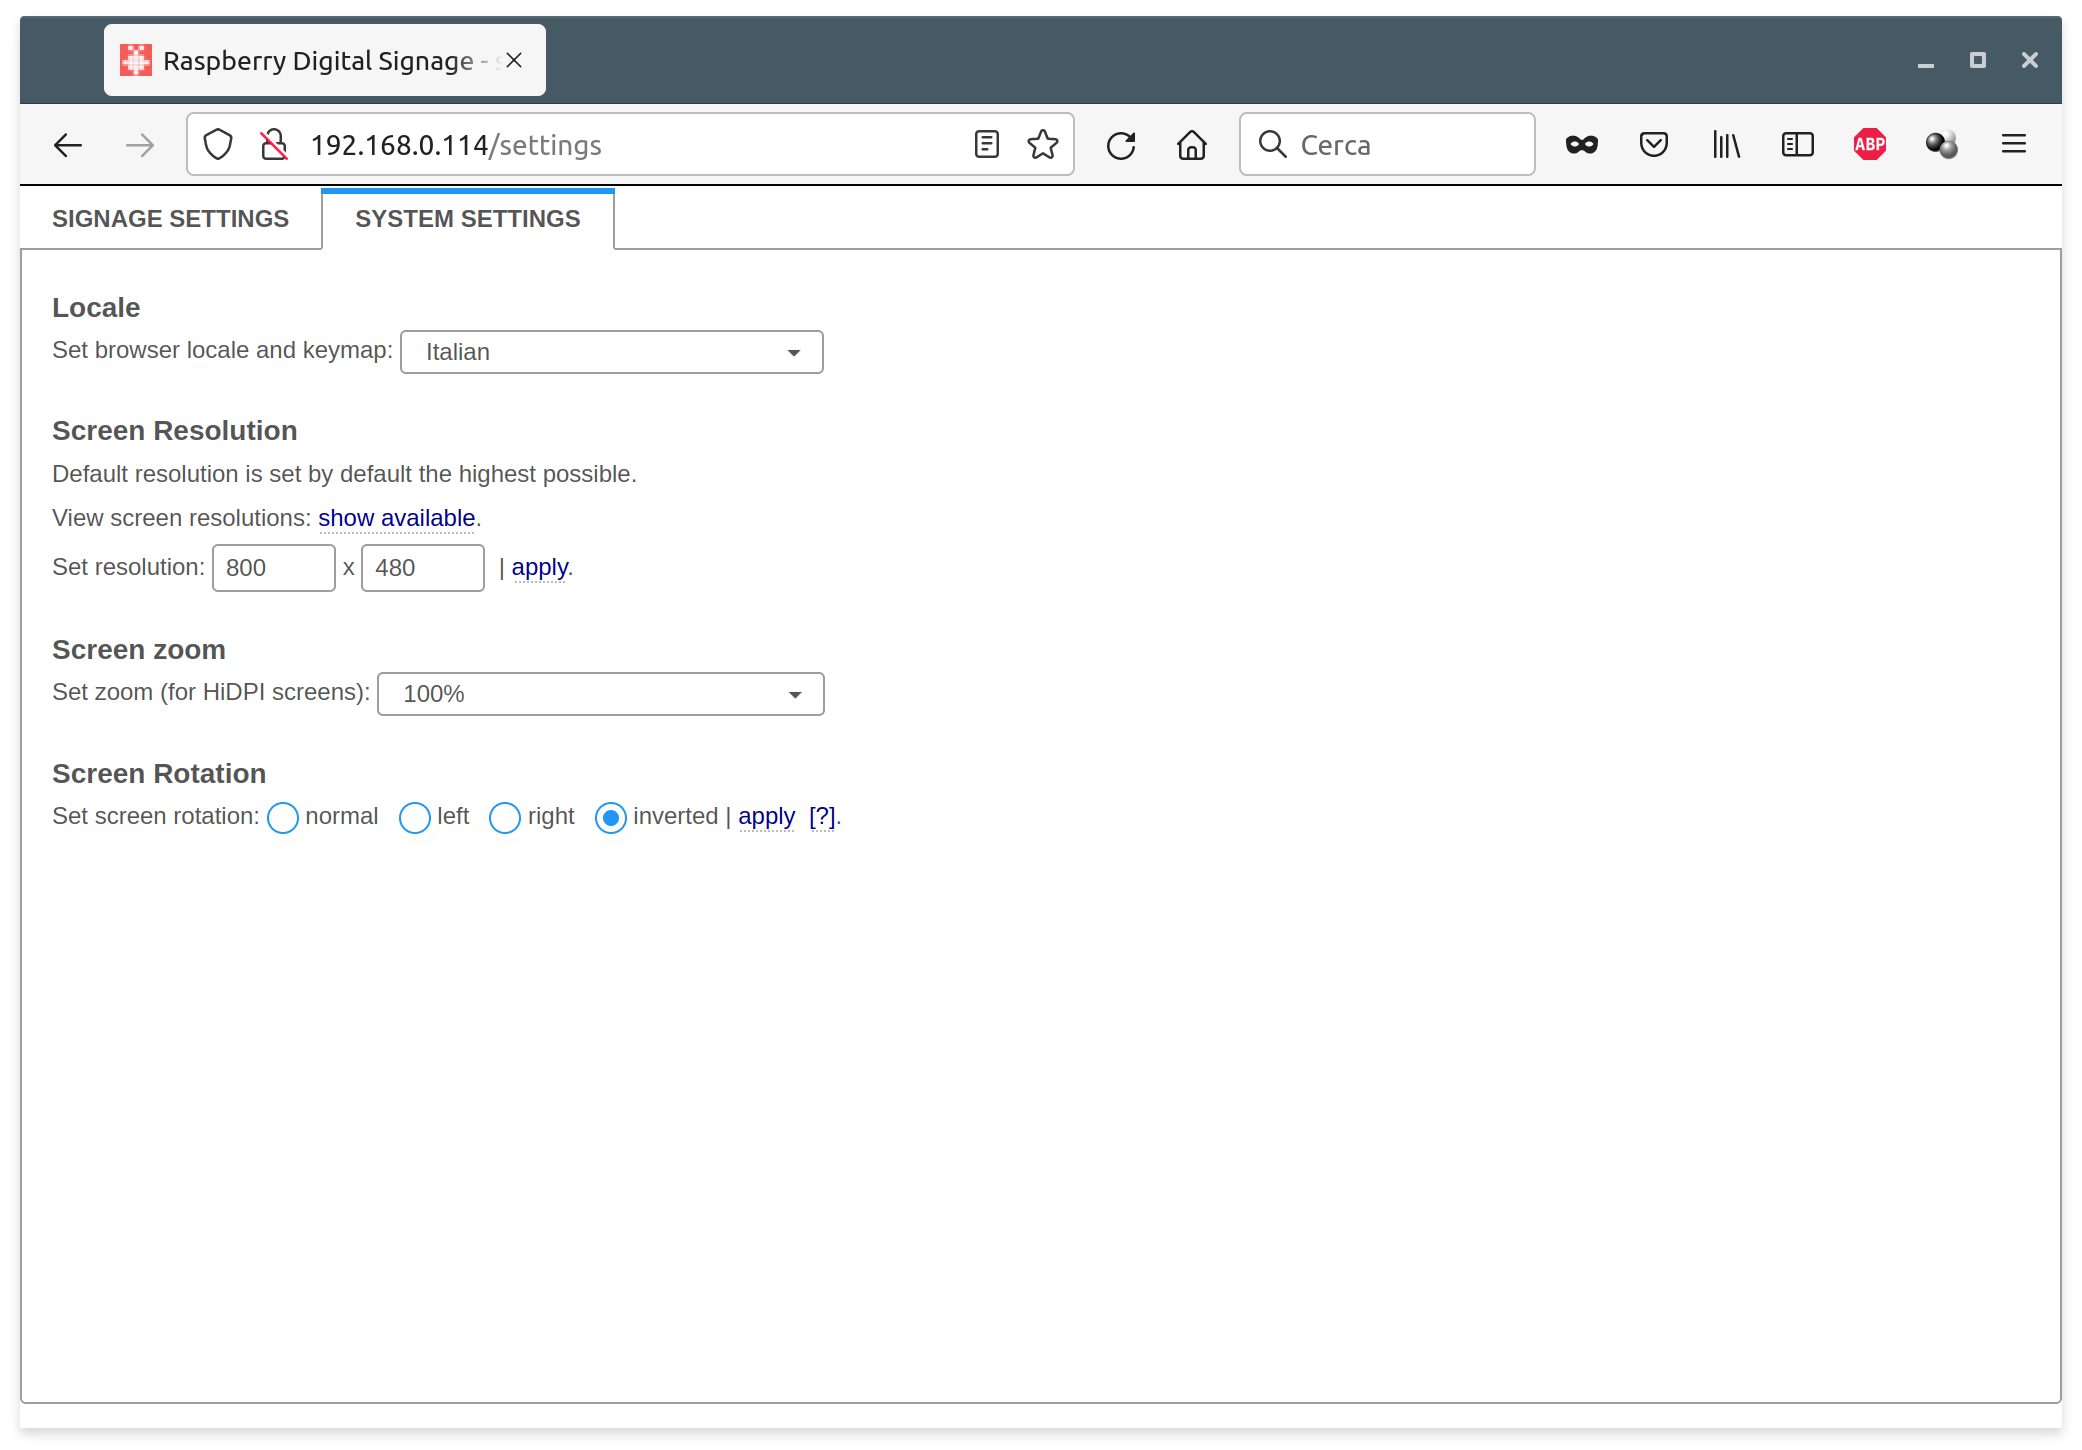
Self explanatory.
About the screen rotation, please also see the System screen rotation FAQ on the FAQ page.
Kiosk mode
Raspberry Digital Signage boots in full-screen (kiosk) mode displaying the saved web resource with all the saved settings applied; mouse pointer auto-hides in some seconds of inactivity. For security reasons, some keyboard keys are disabled.
You cannot exit to the console in any way except stopping the rds service via SSH.
Please do not hard reboot your Pi while in production.
Kiosk mode with visible address bar
Raspberry Digital Signage is designed for digital signage installations – it’s a full-screen browser-face system, you know already. The Web Kiosk “plugin” restores the address bar and tunes the system in a way it can be used for “web workstations” (often found in cafès, offices, schools, hotels, hospitals, libraries), where people can freely surf the web.
Using SSH (donors’ build only)
You can SSH into the Pi in order to set up the underlying Raspbian operating system (quite the same as with a standard Debian OS) and configure Raspberry Digital Signage without a GUI as well.
You can perform an SSH login with the following clients:
-
*nix users will make use of the native ssh client – open the terminal emulator and type:
ssh rds-user@RASPBERRY_IP. - Windows users will use Putty, MobaXTerm, any cygwin-derived program or the Linux Subsystem for Windows (preferred; in this case the syntax is identical as the *nix users’).
Use the following default credentails:
user: rds-user
password: password
then, once in, type: sudo -i for administrative rights (root)
When admin screen password is modified, SSH password will be changed accordingly. So, if you set a password for the admin interface, the new SSH password will be identical. This way you can protect both system settings’ modification via browser (admin interface) and via SSH with one step.
Please change the default SSH password for your security.
Configure the system via SSH // Backup and restore settings
The following files can be copied onto a new copy of the same version of Raspberry Digital Signage in order to move your settings from an installation to another.
- Modify the config file of your interest in the /etc/rds/ folder and then restart the Raspberry Digital Signage service: systemctl restart rds. Yes, rds is a standard Systemd unit.
- For the network, standard /etc/network/interfaces.d/* and /etc/resolv.conf files are used.
- For locale and keyboard, standard system files /etc/default/locale and /etc/default/keyboard are used.
- Screen: /etc/X11/xorg.conf.d/resolution.conf (resolution), /rds/home/rds-user/.Xresources (dpi).
Please note that passwords must be set manually using the admin interface.
Plugins
See the plugins page.
Browsing whitelist
In order to add an internal filtering HTTP proxy with a whitelist behaviour (users allowed to browse only a specific set of sites), use follow the steps.
1. Install tinyproxy via apt and change its config file to include:
FilterURLs On

FilterDefaultDeny Yes

Filter "/etc/tinyproxy/whitelist"
2. Create a whitelist with only the domains that you want the user to browse (when displaying your websites, make sure no resource loading is blocked by the whitelist; use the Chromium’s developer console for the purpose).
3. Set localhost:8888 as the proxy server in the admin interface.
Thanks to Louis DeRobertis.
Players’ orchestration
So far, this page refers to one (only) Raspberry Pi unit. A web interface is also available for the purpose to command many units (“players”).
Signage Orchestrator is a central web interface you can use to schedule Raspberry Digital Signage players to display URLs in a calendar-based timetable. More information here.
JSON interface
A REST JSON API is also available, so any device running Raspberry Digital Signage can be driven via its API interface. Here a Postman collection. A basic auth is used for every call. Easy as pie 😉
(1)
(a) In order to disable sending the token, just comment out the related “method” in /rds/bin/actuators/network/get-mac-address.sh via SSH.
(b) Because the token is calculated only when the kiosk URL is saved, when cloning a system to many devices the token will be the same for all. A solution could be to update the token based on the MAC address for each boot to be sure it’s always updated (for a trivial example with some lines of code in /etc/rc.local). Thanks to Yannick Dessertenne.
(2) The scroll bar extension seems to work only in compatibility mode or after a page refresh (Reload of web page feature).
root